Showing posts with label home skills. Show all posts

Sunday, 26 March 2017

Homemade Yoghurt

As part of becoming more self-reliant, we've been enjoying making some of the food and other products we use at home. Foods like honey, preserves such as olives, jam, sauces and fruit, and products such as soap, dishcloths, laundry detergent and home cleaners.

With an interest in fermented foods from a health perspective, I had been wanting to make our own yoghurt for some time. Well I finally got around to it, and now that I've made several batches, I don't know why I put it off for so long!  

Breakfast - homemade yoghurt and homemade muesli


The basic process involves adding yoghurt culture to milk at 37C, whereby the culture consumes the lactose (or any other sugar) in the milk.  After a minimum of 8 hours at this temperature the milk becomes yoghurt.  

There are all sorts of nifty ways to keep yoghurt warm while it ferments.  Some of these include:
  • put it on top of hot water heaters (unfortunately our HWS is located outside in the open air so the option is not really suitable for us) 
  • on top of coffee machines (we don't have one) 
  • in a warm oven (we didn't want to wait for the oven to have been used in order to make our yoghurt) 
  • wrapped in blankets 
  • in an esky (cooler) with hot water.  
After considering our options I took the easy way out and bought an EasiYo yoghurt thermos ($23.50 from BigW) to incubate the yogurt in.  I'd heard that this system worked well so I thought I'd give it a try.  It consists of a thermos and a jar that sits inside the thermos to hold the yoghurt. Yeah, it's plastic, but it works well and makes the process simple ........... which means I'm far more likely to make yoghurt than if I had to fuss around with blankets. But that's just me.


EasiYo thermos


Boiling water is poured into the hole to fill the space below the red shelf

For my first batch I used some live yoghurt culture bought from Green Living Australia.  I bought the Tangy Yoghurt Culture ($16.95) and the Non-Dairy Yoghurt culture ($17.95). Each sachet contains enough culture for 100 litres of yoghurt (you only use a very, very tiny amount to make 1 litre) and you can make this stretch even further by using some of the previous batch of yoghurt as the starter for the next. The culture will keep for 2-5 years in the freezer. I liked the idea of purchasing the culture as it means I don't always have to have a previous batch on hand if I decide I want to make yoghurt.

We have a thermomix so that is perfect for mixing and heating.  However you could easily do it on the stove using a thermometer.  

The method I followed was from the Thermomix Everyday Cookbook but I have played around with quantities and use slightly less than the recipe in the book:

Ingredients: (makes 1kg yoghurt)

  • 800g full cream organic milk
  • 50g milk powder (the addition of milk powder makes a thicker yoghurt - I used 20g or none)
  • 3 tablespoons yoghurt containing live culture (I used the Tangy culture for my first batch and 2 dessert spoons of homemade yoghurt for subsequent batches)
Method:
  1. Combine milk & powdered milk in Thermomix bowl for 10 seconds, speed 7.
  2. Cook for 30 minutes at 90 degrees, speed 1. (This kills any bacteria in the milk, preparing it for the addition of the live yoghurt culture)
  3. Cool mix to 37 degrees. The mix must cool to this temperature before adding your starter or you will kill the live culture. It may take up to 60 minutes but you can speed this up by putting the bowl in the fridge.
  4. Once at 37 degrees add your starter (the yoghurt or the purchased live culture), mix to combine for 4 seconds, speed 4.
  5. Then heat for 10 minutes, 37 degrees, speed 1.
It's very important that the utensils you use to make your yoghurt are clean and sterilised. While the yoghurt is cooling to 37C I wash the yoghurt jar and lid in hot soapy water and then rinse them. Then while the yoghurt mix is heating in the final step I fill the clean yoghurt jar with boiling water and let it sit until the yoghurt is ready to add. I also pour boiling water over the underside of the clean lid, let it sit for a little while then put the lid, underside down on a clean tea towel. 

Once step 5 is complete, pour boiling water into the EasiYo thermos up to the correct level. As shown in the photo above, the yogurt jar sits on a shelf above the level of the boiling water in the EasiYo thermos. (You don't want the container holding the yoghurt to come in contact with the boiling water).  Empty out the boiling water sitting in the yoghurt jar and pour in the yoghurt mixture.  Screw the lid on and put the jar inside the thermos. Leave the thermos somewhere where it won't be disturbed for at least 8 hours, and longer for a thicker yoghurt. Once done, you can  transfer the yoghurt into another jar to free up the yoghurt jar for making another batch.


Two batches of yoghurt in the fridge - some from the batch on the left was used to make the batch on the right


As you can see, yoghurt made in this way is super easy. The organic full cream milk we used was purchased on special (50% reduction) so that made the yoghurt even cheaper to make.  I've yet to try making the non-dairy yoghurt but as I only drink soy milk I'll have the ingredients on hand. 

The Green Living Australia website has recipes for dairy, soy, almond and coconut yoghurts so there are plenty of yoghurt making options available.  Making your own yoghurt is not only easy, it will save you money while at the same time, give you control over what goes into the yoghurt you eat. I won't have to make many batches before I've covered the cost of buying the cultures and the thermos.  What's not to like about that?


Tuesday, 14 February 2017

Current reading list

Here's a few of the books that we've been devouring of late:

The New Nature by Tim Low.  This is a fascinating book that explores nature, our preconceptions of what 'nature' is and how we humans interact with it. Our tendency is to think of nature as wilderness and separate to us, but in fact as Tim shows, nature is everywhere around us, often exploiting man-made environments in unexpected ways.  While human activity has been responsible for loss of diversity, other native animals thrive in urban areas and some endangered species are only found in habitats altered by human activity.  It really opened my eyes to what we see around us, how it can be interpreted, how native plants and animals interact with us and the implications for ongoing conservation efforts. 


The Art of Frugal Hedonism by Annie Raser-Rowland and Adam Grubb.  This book is a hoot as well as being a great source of tips and ideas.  If you want to tread lightly on the earth, enjoy life and save lots of money in the process then living a more simple and frugal lifestyle is the way to go.  The authors share how this can be achieved whilst still having a rockin' good time.  How can you go past chapters entitled "Don't be a snooty bum-bum" and "Bow down before the nanna and get ahead of the curve"? Here at PragSust HQ we are already doing many of the things covered in the book but Annie and Adam take the ideas to a whole new level.  Definitely worth reading and very enjoyable.


Down To Earth by Rhonda Hertzel.  After reading Rhonda's most recent book, The Simple Home, I knew I had to read this. I wholeheartedly enjoyed this book, have read it several times and given copies as gifts to friends.  Rhonda eloquently describes the ways in which we can all live a simple and more self-reliant life while spending less and enjoying life more.  The book outlines practical ways in which we can take control of our lives, become more of a maker than a consumer and reduce our environmental footprint in the process. Covering topics like finances, green cleaning, home skills such as cooking, preserving and much, much more this is a great book no matter what age or stage in life you're at. We now make our own laundry detergent and green cleaners using recipes in the book, foods such as yoghurt, as well as sustainable household goods such as the knitted dishcloth! Thank you Rhonda for sharing the things you've learnt on your simple living journey and for inspiring the rest of us.


We'd love to hear what books you're currently enjoying.


Tuesday, 25 October 2016

It all adds up

Being interested in sustainability, simple living and permaculture, we read a lot of blogs on those subjects. It's both inspiring and instructive to read about the different things that people do to in order to live more sustainably. There is so much helpful information out there.

We've made many sustainable changes to our home - including adding solar hot water, PVs for electricity generation, water tanks, switching to efficient wood heating (using waste wood) and creating an organic fruit and veggie garden. Alongside all of this, we've also been making continual small changes to how we live, and learning new skills along the way.  

When you're working towards living more sustainably I think that sometimes the smaller steps you've made towards that goal can be forgotten.  Probably because doing these things just becomes part of normal life.  However the other day I had a little reminder.  I was putting together a few homemade things as a gift for a friend. When I stopped and looked at what I'd gathered I realised that these items were the result of some of the smaller steps we have taken to live a more sustainable life.  


Here's what it contained:
  • Honey from our backyard hive. You can read about how we extract our honey here, here and here.
  • 100% cotton reusable knitted dishcloths (or face washers). I've been having fun making these using cotton yarn from my stash.
  • Preserved olives collected from our backyard trees. See the recipe here.
  • Homemade Tamatar Kasaundi (Tomato oil pickle). From "The Complete Asian Cookbook" by Charmaine Solomon. This is absolutely fabulous stuff - very spicy!  I'll post the recipe soon.
  • Homemade laundry liquid.  From the book "Down to Earth" by Rhonda Hertzel.

That little lineup of home produce made me stop and think. Those little things do make a difference - we are a more sustainableresilient and healthy household as a result of being able to produce more of what we eat and use at home 

It would be great to have more free time to tackle lots more sustainable projects. There are lots of things we'd like to do.  Right now though, life is busy with full-time work, after-work activities, volunteering, and time spent planting trees on our country block.   Given the time that we have, continuing to make small changes in order to live more sustainably is something that works for us.

I think little things do add up and small changes can make a difference.

What do you think?


Monday, 20 June 2016

Homemade toothpaste

Making our own sustainable versions of everyday products is something we're pretty interested in here at PragSust HQ.  It's nice to know and control what's in the products we use on our bodies and those we clean our homes with.  

Homemade toothpaste is something that's been on our radar for a while.  There are lots of recipes online but we liked the sound of the one posted by Morag on her blog Our Permaculture Life, so we thought we'd give it a go. Here's the recipe:

Homemade toothpaste

  • 1/2 cup bentonite clay (food grade)
  • 1 tablespoon activated bamboo charcoal (food grade)
  • 2 tablespoons baking soda (sodium bicarbonate/bicarb))
  • 2/3 cup water
  • 1/4 cup coconut oil (warmed to be liquid for mixing)
  • 2 leaves of stevia (dried and crushed) or 1/4 tsp stevia or 2 drops (optional)
  • 1 teaspoon himalayan salt
  • 4 drops peppermint oil (food grade)

Homemade toothpaste ingredients


As the charcoal powder is very fine and easily flies about, it's best to add the charcoal powder to the water, not the other way round.  The information sheet that came with the charcoal suggested using stainless steel equipment and doing any mixing in a stainless steel sink to avoid splashing the charcoal as it could stain. 

 We gently melted the coconut oil in stainless steel bowl over a saucepan of boiling water. Once melted we placed the bowl in the sink then added the water, followed by the charcoal.  The other ingredients were then added in the order listed above.  A stainless steel spoon was used to mix everything by hand.  The ingredients combined easily and we soon had a dark grey mixture with the consistency of........toothpaste. 


The mixture was transferred to a glass jar for storage. The toothpaste has been in use for a while now and I can honestly say that my teeth feel nice and clean after using it.  So we'll chalk that up as a win and something we can cross off our grocery list from now on.


Sunday, 5 June 2016

Preserving the harvest - Cumquat marmalade

Our little cumquat tree fruited well this year. We like to give home produce as gifts so this weekend we turned the harvest into cumquat marmalade.

Here's the recipe we used. It's based on one published in The Age newspaper, many moons ago.

Cumquat Marmalade

Ingredients
1 kg cumquats
5 cups water
2 tblspn lemon juice
5 cups sugar

Method
1.  Wash the fruit and cut them into quarters, removing seeds and placing them in a small bowl.  Using containers with lids, soak the seeds overnight in 1 cup of the water, the fruit in what remains.


2.  Transfer the mixture to a large saucepan and stir in the lemon juice.  Bring to boil, then reduce heat and simmer, covered, for 30 minutes until cumquats are tender.

3.  Add sugar, stir over heat without boiling until sugar dissolves.  Bring to boil over high heat , then continue to cook, uncovered, without stirring for about 20 minutes or until marmalade jells when tested.

4.  To test if the marmalade is ready place a teaspoon of it onto a cold saucer and place in freezer for 2 minutes. Remove from freezer and press your finger gently against the marmalade to see if it wrinkles and has formed a skin. If not, keep cooking the marmalade for another 5 minutes, then retest.

5.  When ready, remove from heat and allow to settle for 10 minutes. Scoop out any remaining pips at this point and discard. Pour into hot, sterilised jars and seal.

To sterilise jars: Wash in hot soapy water. Rinse. Place upside down on tray in warm oven (120 C) for 20 minutes. Useful to keep in oven while making the marmalade. Sterilise lids by putting them in boiling water for a couple of minutes. 


Thursday, 14 January 2016

Mini sewing project - ironing board cover

My ironing board cover had worn through and was in need of replacing. When a friend mentioned hers had worn out too, we figured we may as well have a go at making our own

A rumage around in my small fabric stash turned up some heavy weight cotton I'd bought ages ago. There was enough to make 2 ironing board covers so we were set to go.

First step was to trace the shape of the ironing board onto the fabric. There was a bit of foam under the old cover so we used that as a guide. We added an additional few inches around the edge to allow for the cover to fold under the board and to make a casing for the elastic.


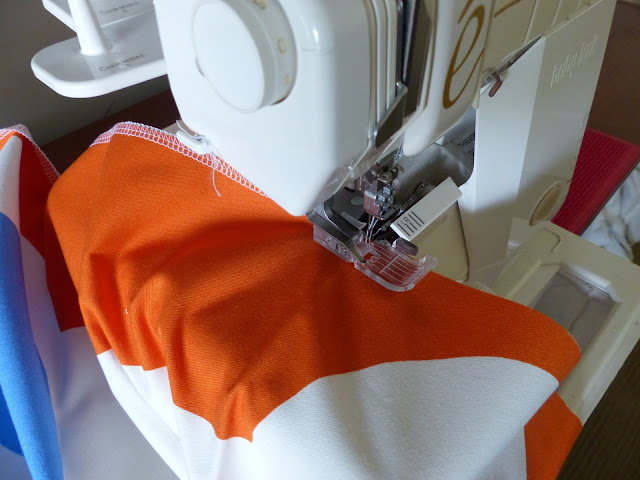
Once the cover had been cut out the next step was to overlock the edges.


Then it was time to make the casing for the elastic, leaving a gap at the end to insert the elastic and thread it through.


After the elastic was in place, the cover was fitted over the board and the ends of the elastic were tied in a knot. We then pulled the elastic tight, to fit the cover snugly on the board and used another knot to secure it in place. The elastic was then tucked out of sight into the edge of the cover under the board.  

Et voila! The ironing board was ready for use again:


As you can see the whole process was pretty simple and it didn't take long.  

It felt good to be able to make something we both needed out of resources we already had, rather than go out and buy it.


Sunday, 31 May 2015

Preserving Olives in brine

This year our olive trees produced a bumper crop. After watching the olives ripen on the tree for some time and thinking "gee, I should pick those", I finally got around to picking them yesterday. After filling 2 buckets I reckoned I had enough.....


We've tried a few ways of preserving olives and this time I thought I'd just use the brine method. I followed the recipe described in the book Preserving the Italian Way by Pietro Demaio, with a few minor changes.

Pietro has some basic rules about pickling olives which I'll mention here:
- Always use fresh unbruised fruit
- Make sure your utensils are clean and are either glass, stainless steel or unchipped enamelware bowls. Copper, brass and aluminum react with the olives and spoil the flavour.
- Fill the jars so the brine is above the olives. If any of the olives are above the brine, they will turn brown, soft and taste mouldy
- Wipe the rim of the jars well to ensure a good seal.

Okay, time to get started. First up, give the olives a good wash.


Then use a sharp knife to slit each olive.  This wasn't mentioned in the recipe but from my online research (yay internet!) it enables the brining process to work much more quickly to extract the bitterness.  


I wasn't sure how much brine solution I'd need for the amount of olives I had so I packed the slitted olives into clean jars to get an idea. The olives should be tightly packed to minimise floating once the brine is added.


I ended up with quite a few jars...


For making the brine, I used the traditional method consisting of salt, water and a raw egg (still in its shell). Warming 5 litres of water in a large pot on the stove, I gently added my egg and then some salt (non-iodised), stirring gently to dissolve the salt.  To get the brine solution to the right concentration, you continue to add salt, stirring to dissolve, until the egg floats.  It's important to use a fresh egg.  This is because the older the egg, the more air is inside it and consequently the less salt is required to get it to float.


Brine at correct concentration

Once the egg is floating, remove it and bring the salty water to the boil.  Once boiled turn off the heat and let it sit for 5 mins.

Then pour the still hot brine into the jars, covering the olives and seal. I filled the brine to the very top of the jars to minimise olives floating.  I had underestimated the amount of brine I needed so had to make up another couple of litres.

The jars, once cool need to be stored in the dark so I put my jars in a cardboard box somewhere cool.

The recipe mentioned adding garlic, lemon, chilli and a fennel flower to each jar (I didn't) and stated that the olives can be eaten after 6 months. However as I slit my olives, they should be ready in less time than that.  

Other recipes I came across suggested that the jars should be agitated a few times a week. The brining time will depend on the ripeness of the olives and how salty you like them ...so you need to taste them every few weeks to determine when they are ready.

Once the olives are ready I'll need to pour off the brine which will now be very bitter. Then they can be eaten straight away or stored. There are a few storage options to choose from - in a new brine solution, in olive oil or in vinegar.

Fingers crossed for success!


Sunday, 20 October 2013

A home brewing byproduct that's useful for the garden


When bottling your beer, you'll notice that once you get to the level around the tap, there is a layer of residue at the base of the fermenter with a cloudy liquid layer above it.  If you look closely at this picture you can see the residue layer - it's the lighter layer below tap level at the base of the fermenter.


You don't want to bottle this residue so when you reach the cloudy liquid level just above it the bottling process is complete.  But just because you don't bottle the residue doesn't mean it's entirely a waste product.  It works a treat in the garden as snail and slug bait. You've probably heard of using beer to catch snails - well this stuff is beer plus other brewing residue and we've found it works even better.
 
We pour the residue from the fermenter into an empty juice bottle to store it and then use it as needed. Cut off the bottom of soft drink bottles to make a saucer and you are set.  In the picture below we have used the lid from the can in the beer kit. Place saucers of the residue around your vegie garden where snails and slugs are a problem.
 
 
The slugs and snails go crazy for the stuff, crawl in and drown. You'll be surprised to see how well it works!
 
By the way, the plants in the picture above are mostly volunteer plants. The exception is the onion which sprouted in our cupboard ....so we planted it.  The endive on the left was a volunteer in a friend's garden, and the oakleaf lettuce and potato were all volunteers in our garden.  It's the direct benefit of letting some things go to seed - our bountiful lettuce crop this year has been all from volunteer plants.


Saturday, 12 October 2013

Bottling your home-made beer

So your beer is ready to bottle. You've checked your hydrometer reading and it's A-Okay.  What's next?  Well, it's time to assemble your bottles and other equipment (as covered here) and transfer the beer from the fermenter into your bottles.

Here's how we do it.

Rinse out your clean bottling valve with sterilising solution and attach it to your fermenter


Sterilise your clean stubbies and add the white sugar to each (required for the secondary fermentation in the bottle). We fill the bottle rinser with 500 ml of the sanitiser and use that to sterilise the bottles. All you do is place the bottle over the spout and push down a couple of times. This causes the sterilising solution to be sprayed into the bottle.


Then using the funnel and the priming scoop, add the sugar to the sterilised bottle.  The smallest measure on the priming scoop is the right amount of sugar for a stubbie.


The bottle is then ready to be filled with beer. Put the bottling valve in the empty bottle so that the tip presses down on the base of the bottle. Open the tap on the fermenter and fill the bottle. Remove the bottle when full and gravity automatically cuts off the flow.


Now it's time for the lid.  We spray sterilising solution on a clean dinner plate and then cover the surface with lids, with the underside of the lids facing up. Spray sterilising solution over the lids and then turn them over.  This will keep them clean while you do the bottling.


Now get your capper ready. We use a bench capper because it's easier and there's minimal chance of the bottle breaking while you're capping it. Sit the bottle on the rubber base of the capper (the rubber base is orange on our capper), sit the lid in place on the bottle, adjust the height of the capper if required, and then pull down on the lever. Release the lever and your lid will be firmly on the bottle.

 
Invert the capped bottle a couple of times to ensure the sugar is well mixed. Then repeat the process on the next bottle.  When all the bottles are done we write the date and type of beer on the caps and store them in boxes. Here's the end result of our last beer batch:


Leave the beer for at least a month before drinking as the flavour will improve over time.

And that's all there is to it - you have now made your own beer!

So what's this got to do with sustainability? That's a topic we'll cover in another post..


Wednesday, 2 October 2013

Brewing beer at home

What could be more pleasant on a warm summer's day than relaxing in your productive garden with friends, enjoying the fruits of the season that you've grown yourself...and a lovely, cold, home-brewed beer?

If you have been put off by bad home-made beer in the past, it's definitely time to revisit the whole 'let's make our own beer at home' idea.  As a uni student, I made beer and to be honest, it tasted pretty horrible. Fast forward quite a few years (I won't say exactly how many) and we now make very nice tasting beers at home.  Stouts, ales, lagers - you name it, you can make it. It's easy, it saves you money and the end result is a high quality product.

Now I will freely admit we are not what you would call 'hardcore' beer makers.  We use beer kits to make our beer.  For us, this choice is primarily a matter of time and convenience. We work full-time, we have a lot on the go and there's only so much time in the day.  So we aren't driven to try to make our beer from scratch using the raw basic ingredients.  Maybe one day. Right now we are more than happy with the quality of the beer we make from kits. As are our family and friends :)

To make your own beer, you will need some basic equipment. Brewing shops, such as Australian Home Brewing, sell all the equipment you'll need as well as a wide range of beer kits. You can also purchase the bits and pieces online.

The basic equipment you'll need is listed below. It sounds like a lot of stuff but the more expensive items you only need to buy once.   You'll find that your set up costs will be recouped once you've made a few batches of your own beer, if you compare how much it would have cost to buy the equivalent amount of beer at the bottleshop. That's the way we looked at this initial cost outlay.

Here's what you'll need:
 

A large stainless steel stockpot. You probably already have something that fits the bill.

A slotted spoon. For stirring the beer mixture.

A 30 litre fermenter with fittings (tap, airlock)


Cleaning agent. For cleaning the fermenter and other equipment after use. 'Brewclean' is one such product.


Sanitiser. For sterilising the equipment prior to making a batch of beer. One such product is called 'Brew Sanitize' (shown below). This is a concentrate.  You dilute 30mls of sanitiser with 970 ml water to make 1 litre of sanitising solution that's ready for use on your equipment. We store this in spray bottles for ease of use. A bottle of Brew Sanitize lasts us quite a while.


A hydrometer and plastic test flask. This is used to check the specific gravity to determine if the beer is ready to bottle.


For bottling your beer you'll also need the following:

Beer bottles. Save your own stubbies, and get your friends to do the same. Not having to buy bottles keeps your costs down. Wash the bottles and store the clean, dry bottles in a box to keep them clean - having clean bottles ready to go will save a lot of time when you are preparing to bottle your beer. Amber or green glass bottles are better than clear glass or plastic. Non-twist top bottles are reputed to be better than twist top bottles with respect to cap sealing.
 
Bottling valve. This attaches to attach to your tap. You place the valve in the empty bottle and pour. Remove the bottle when full and gravity automatically cuts off the flow. This fills a bottle quickly with no waste.


Bottle caps/crown seals. These come in packets of 250 upwards. Non-recyclable.

Bottle rinser.  Used to sanitise the bottles before adding the sugar. You can do a whole batch of bottles quickly using one of these. Not required but very useful.


Priming scoop. Used to add sugar to bottles before adding the beer. The sugar is required for the secondary fermentation within the bottle.

Small funnel. Mess-free way of adding the sugar from the priming scoop to the beer bottle.


from left: priming scoop, funnel

A bench capper (for bottling the beer). These work much better than the hand cappers and are worth the extra investment.


So that's the equipment covered. Now it's time to buy a beer kit.  You can get these at some supermarkets, but the best ones are available at home brewing shops.  The range is impressive - you name a beer, there seems to be a kit to make its equivalent. Beer kits have certainly come a long way in the last decade!

Each kit comes with all the ingredients you need to make your brew, as well as instructions on how to make it. 


kit contents


Instructions

We follow the recipe but tend to do the combining of all our ingredients in the stockpot on the stove, before adding it to the sterilised fermenter. 

It's best to get your fermenter equipment ready before making the beer.  Your fermenter must be clean and sterilised.  We always clean it out after bottling a batch of beer - it is much easier to do this then, rather than doing it later after the residue is all dry and caked on. Then all we need to do is sterilise it before use.

To sterilise the fermenter, lay a clean tea towel on your kitchen bench, sterilise your clean fermenter with your sterilising agent (a spray bottle containing the sterilising solution works well here) and sit it upside down on the tea towel to drain. Sterilise the fermenter lid and place it on the tea towel (underside facing down). Rinse the airlock with sterilising solution and lay on tea towel. Once that's done, you're ready to start the brew in your stockpot on the stove.


sterilised fermenter and lid sitting on clean tea towel

Follow the recipe in the kit, adding the ingredients to the pot as specified and stirring with your slotted spoon to completely dissolve.


Once the brew is ready, pour it into the fermenter, and top up with cold water as per the recipe instructions. Add the yeast when the temperature of the brew reaches that specified in the recipe.  Screw the fermenter lid on tight, re-sterilise the end of your airlock and place the airlock (containing clean water or a non-rinse sterilising agent) in position in the lid. Place your fermenter somewhere out of the way and out of direct sunlight. Then leave it to do it's thing. You should hear a 'blupping' noise coming from the fermenter within about 24 hours.  This is the yeast doing it's job.  Leave it for a week or so and it should be ready for bottling. Check the specific gravity with your hydrometer to ensure that it is ready for bottling. If it's not quite ready leave it a few more days and check again. You want to get this right otherwise you run the risk of exploding bottles of beer - not nice.

We'll cover the bottling process in another post.

photos 1-5 via