Thursday 23 February 2017

Hive goes on a road trip

Back in December we split our hive so that we could take a new hive to our country block. An inspection in mid-February showed the 5 frame nuc was pretty full and bees were starting to build comb in the roof space.  A good indication that it was ready to go into a full size box. So we decided it was time to take this little hive on a road trip.  

We had always planned to move the hive while it was still in the nuc for the following reasons:
  • Nuc base is attached to hive body - no chance of separation occurring during transit
  • Hive body has clips that securely attach it to the lid
  • Good sized ventilation hole at back of hive that should provide sufficient air when front entrance is blocked for transport
  • Nuc fits nicely in back seat of car and can be secured with a seatbelt.
  • Nuc size makes it easy for one person to lift
Our 5 frame nuc, viewed from the back


I'll admit to being a bit nervous about taking a 2 hour trip in the car with a hive. To make sure we were as well prepared as possible we created a step by step plan of how we'd go about the move and ran it by a couple of experienced hive movers.  In our plan we also had to incorporate a means of feeding the hive, at least until we could establish if it was finding enough forage in the surrounding area.  

A hive in suburbia has ready access to some sort of forage most of the time; particularly in Melbourne's leafy eastern suburbs. However our country block is surrounded by grazing farms and large monoculture eucalypt and pine plantations. Local grazing farms - and our block - at times can have areas of useful bee fodder weeds such as capeweed and wild radish/turnip. We have some clover in our pasture. There's also some smallish areas of native vegetation starting at about 1km distance, various other weeds in roadside verges and on our block some paddock trees and earlier plantings that provide some pollen and nectar. And we're planting a load more trees that all going well will eventually provide excellent bee fodder. However, what's available now might not be enough for a new hive to amass enough stores in time to see out the winter. There are wild bee colonies in dead tree hollows - standing dead blackwoods do a good job of providing this accommodation -  around the place so bees live in the area but as we were taking the hive down there at the tail end of summer, we wanted to make sure it had enough supplies if current forage was slim. 

To further complicate things, we have curious wombats (not so jokingly known as 'bulldozers of the bush") on our block. This makes attaching an external feeder more problematic as these rather large critters could easily knock it over if they decided to investigate the hive on their nightly rambles.  Any time we do anything new at the block the very next visit shows that wombats have given our efforts the once over and usually left a deposit to show they've visited. A month or so prior to the hive move we'd placed a large concrete paver in position for the hive to sit on. Our very next visit showed this has been well truly pooped on and scratched around! 


Wombat on nightly ramble - source


Okay, back to the hive move. The process of moving our hive was done over 2 days in February, as described below.

Day 1
Materials used:
Spare 8 frame box
Bee escape gear
Entrance closure equipment - piece of wood and gaffer tape
Large ziplock bag
Sugar - to prepare a solution of 2:1 sugar syrup

The nuc was going into an 8 frame box so we needed 3 additional frames.  Foraging conditions in the country are quite different to suburbia so we wanted to ensure the new hive had plenty of stores.  To do this we took out 2 frames of honey and one frame of drawn comb from our main hive and replaced those frames with new frames that had wax starters strips. To get the bees off the frames we used our bee escape gear. We placed the frames in the spare box and used the bee escape lid to enable the bees to leave the frames of their own accord.


Bee escape lid and base, box contains frames of honey

Bees starting to crawl out the mesh cones - see far left and far right cones

A couple of hours later there were no bees in the box.  We took the frames inside and securely packed them in a foam broccoli box so they wouldn't move around during the car trip.


Bubble wrap and cardboard used to stop frames from moving and spilling any of their contents

Once it was dark it was time to close up the hive in preparation for the relocation.  We used a strip of wood and lots of gaffer tape to close up the entrance and secured the hive with an emlock.

We also ensured that the car had enough petrol for the trip so we wouldn't have to stop on the way. We didn't want to make the 2 hour journey any longer than necessary.

Day 2: Moving day
Materials used:
1 8-frame box, lid and base, hive mat
1 ideal size box
large ziplock bag of 2:1 sugar syrup  
large plastic container in which to sit bag of sugar syrup
sharp knife to slit holes in sugar syrup bag

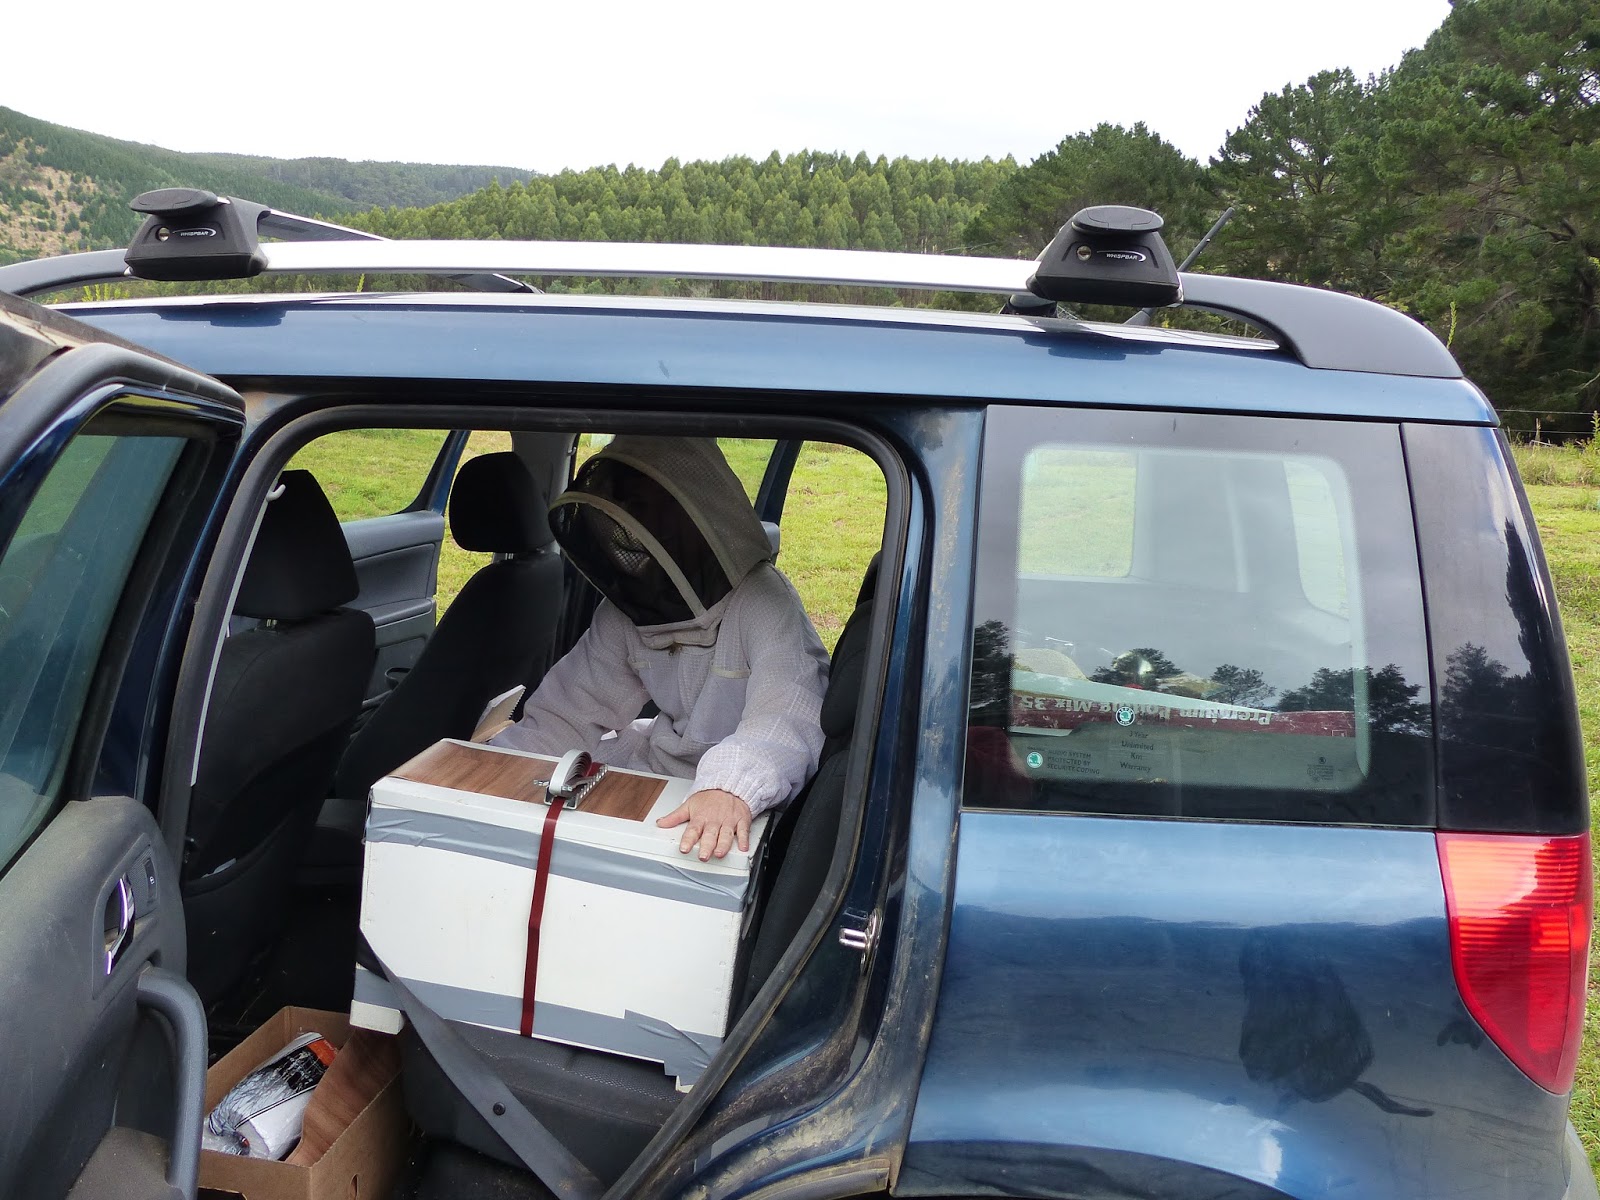
We packed the gear into the car and then put the nuc on the backseat (rear end with ventilation hole facing forward) and strapped it in using the seatbelt. Fully confident in my hive closure technique, Mr PragSust opted not to wear a bee suit as he drove. I, on the other hand, sat in the back next to the hive in my full suit - just to keep an eye on things.

We were on the road by 6.30 am and reached the block around 8.30 am. There were no escapees during the drive which was great.  The forecast was for partly sunny and 20 degrees but it was pretty cold and overcast when we arrived.  


Arriving at final destination

We put the nuc in the pre-determined location and left it closed up for 30 mins to let the bees settle.  


Nuc in position, still closed up

After around 30 min we opened up the nuc and were prepared to exit the area quickly. However there was no rush of bees exiting the hive - just a few came out.

The weather didn't improve and actually got steadily worse throughout the day with heavy rain falling on and off. This meant we were not able to open the hive to transfer the bees into a full size box.  Opening the hive when the weather is too cold will chill the brood. This can  harm and potentially kill a hive.  We had to wait several days for suitable weather to do the transfer.

Two days later was forecast to reach 24 degrees and mostly sunny so things looked promising. After an overcast and drizzly start the promised weather actually arrived about 1 pm so we got to it. The nuc was moved to the side and the full size box was put into position. We made sure the entrance was sited in the same position as the nuc's so bees could easily find their way into their new home.  A honey frame was put on each side of the box (frame positions 1 and 8) and then we opened the nuc. The frames were transferred gently into the new box in the same arrangement as they had been in the nuc.  It's important to do this gently so as not to squash the queen.  We then checked for the queen in amongst the bees remaining in the nuc box and lid but didn't see her.  Our frame of drawn out comb was then put in position 7 and the hive mat was put on top of the frames. Once all this was done we put the ideal box on top. Inside the ideal we put the large plastic container holding the ziplock bag of sugar syrup and made some slits in it so the bees could access the syrup. The lid went on followed by the emlock and all was complete.  We left the nuc on it's side by the hive so that the bees in it could make their way into their new home.


The last of the bees entering their new home. Photo taken late afternoon


We were really pleased with how the whole process went. The bees went quickly into their new home and after a bit of flying around investigating their new digs, foraging recommenced.  Lots of the bees were bringing back pollen so that was a good sign. Some of the pollen was bright orange. Not sure what that was coming from!

Spring at the block this year saw unseasonally cold weather and lots of rain - in short it has been a very bad season for bees throughout the general area. As has been the case for us in Melbourne, beekeepers in the area have had to feed their hives. lt rains a lot there, especially in autumn and winter, and bees confined to the hive can easily work through the stores they've brought in. With this in mind we decided to start this hive off with some sugar syrup. We want the bees to have the opportunity to build up some stores so they can better handle inclement weather and potential dearth of forage. Weather permitting, we'll keep a check on how quickly the sugar syrup is consumed by the bees and feed again as required.


Hive located in shelterbelt, facing east to catch morning sun and shaded from hot afternoon summer sun. Photo taken 6pm. Paddock with cows is next door's block. For those with an interest in agroforestry, the shelterbelt contains mainly silver wattle, blackwood and assorted eucalypts with smaller quantities of several other wattles, banksias, casuarinas and a few western red cedars to maintain an international flavour.


Wednesday 22 February 2017

Splitting the hive

We have a country block and it was always our intention to put a hive there someday. In December 2016, as a method of swarm control for our backyard hive, we split it and started a new hive.

We purchased a mated queen for the new hive. While we could have let the bees make a new queen from a day old egg we decided not to, for one main reason.  It seems possible that the drones in our area are not the most congenial, to put it mildly. Over several seasons of swarming our hive became progressively more and more aggressive....until it reached a point where things were no longer manageable.  Re-queening was our only option. We purchased a mated queen and to cut a long story short - with some assistance, re-queened the hive.  That was a couple of years ago and things have been great since then.  It was a real beekeeping lesson learnt the hard way - don't let small problems become big ones. Anyway, to avoid a potentially similar experience we decided against letting the hive raise it's own queen.  

Our queen arrived in the mail in a queen cage with some attendants and a candy plug  sealing the cage closed (how amazing is it to get bees in the mail?!!). We kept her in a dark undisturbed spot in the house, giving the bees a a drop of water twice a day for a couple of days until we were ready to do the split.  

Here's a picture of the empty queen cage after it was removed from the hive:

Queen cage - originally contained queen and 5 other bees

Looking straight into cage opening. This was originally blocked with candy.
   
Splitting the hive requires a strong colony and some stored honey. The process involves removing half the brood and some of the stores so your hive must be strong enough to be able to cope with this.

Here is how we made the split:

Day 1
Materials used:
- a spare 8 frame hive box 
- a queen excluder

Our hive consisted of 2 full size boxes. We opened the hive and took out 3 frames of brood, one frame of honey and one frame of drawn comb, replacing them with new frames with starter strips. Checking first that the queen was not on any of the frames we'd removed, we shook the bees off the frames back into the hive. The remaining brood was centred in the box with the new frames placed on the outside edges of the box.  The queen excluder was placed on top of the hive, and then the empty box placed on top of that. The brood and honey frames we'd removed were put into the empty box and the hive was closed back up. Overnight the nurse bees should move up the hive to tend to the brood in the top box. These frames of bees will be used to create the new colony.

Day 2
Materials used: 
- a nucleus hive ('nuc') to start the new colony in.  Our nuc is a 5 frame box.
- the queen in a queen cage

We opened the hive and looked in the top box.  The brood frames were covered in bees - yay! We gently removed the frames with the bees on them and put them into the nuc.  The honey frame and the drawn out frame were placed in positions 1 and 5 in the nuc. The empty top box was then removed from the main hive and that hive was closed up.

The nuc was positioned so that the back of the hive was higher than the front. This is important to allow any moisture to drain out but also for the placement of the queen cage.  The queen cage was placed on the top of the frames so that the end with the candy plug faced upwards. That way if a bee happens to die in the cage, the entrance won't be blocked and the queen can still get out. The hive was then closed up and left undisturbed for a week. During this time the bees in the hive will chew through the candy plug to release the queen. This can take a few days and by the time the queen is released the bees will be used to her smell and there is a good chance they will accept her. (Note that if you are re-queening an aggressive hive then additional steps may be required in order to enhance the chances that the bees will accept the new queen).  


Nuc in foreground, rear view

One important thing to note is that the nuc now contains mainly very young bees and a queen. There may be no foragers.  Hence it's important to ensure that the hive has access to sufficient food until it can forage for itself.  We used an external feeder to feed the bees a 1:1 sugar solution and kept feeding until the hive was populated with older bees.  Even then we still fed to see how quickly the bees took up the sugar solution - our thoughts were if it was emptied quickly they were obviously still hungry so it couldn't hurt to feed them.

After 1 week we inspected the hive, and saw the new queen and plenty of eggs. All was well. Over time the hive built up nicely until it was ready for a bigger box. That was the trigger to relocate it to our country block.... but that's a story for another time.


Monday 20 February 2017

Making use of waste

We like finding opportunities to turn waste into something useful.  Why buy something when you can find a suitable free resource? We've talked about how we make compost from the collection of workplace kitchen scraps here, but that's not all we collect for free to use in the garden.

Mulch. All gardeners know the value of mulch in helping to prevent water loss from the soil, suppressing weed growth, and as it breaks down, adding nutrients to the soil.  We have a reasonably sized productive garden and would be spending plenty of money on mulch....if we had to buy it.  But we don't.

A suburb or two away from us is an arborist business. These kind folk leave piles of woody mulch on the naturestrip in front of the business for people to cart away for use in their own gardens.  


We pull up in the car with a bunch of bags and a spade and fill the car with bags of mulch. The bags we use are also recycled from a friend's factory who would otherwise have to throw them out.


Fully loaded car


This woody mulch gets used in the garden to make pathways and suppress weeds.   Before spreading it we mow/pull out most of the main weeds and then cover the ground with thick overlapping layers of newspaper.  The newspapers have been recycled from my workplace for use under the hay bedding in our guinea pig hutch before being used again with the mulch. Double recycling in action!  

Once the layer of newspaper has gone down the mulch goes on top in a nice thick layer. Eventually this woody mulch breaks down and then we move it onto the garden beds....and make another trip to the arborist to load up on some more. 


Woody mulch pathway between garden beds
(bamboo leaf mulch on left bed, grass clippings mulch on right bed)


Suppressing weeds around the beehives 


Weed suppression around the water tanks


 By taking this mulch we are helping the business to deal with what would otherwise be a waste product they'd have to dispose of some other way. In the process we are getting a free source of something that we'd otherwise have to pay for. Everyone wins.

Sometimes we've even done a deal with a local arborist to get a truckload delivered if they happen to be working in our neighbourhood. Bartering some home produce for a truckload of mulch. Seems like a good deal to us 😊


Tuesday 14 February 2017

Current reading list

Here's a few of the books that we've been devouring of late:

The New Nature by Tim Low.  This is a fascinating book that explores nature, our preconceptions of what 'nature' is and how we humans interact with it. Our tendency is to think of nature as wilderness and separate to us, but in fact as Tim shows, nature is everywhere around us, often exploiting man-made environments in unexpected ways.  While human activity has been responsible for loss of diversity, other native animals thrive in urban areas and some endangered species are only found in habitats altered by human activity.  It really opened my eyes to what we see around us, how it can be interpreted, how native plants and animals interact with us and the implications for ongoing conservation efforts. 


The Art of Frugal Hedonism by Annie Raser-Rowland and Adam Grubb.  This book is a hoot as well as being a great source of tips and ideas.  If you want to tread lightly on the earth, enjoy life and save lots of money in the process then living a more simple and frugal lifestyle is the way to go.  The authors share how this can be achieved whilst still having a rockin' good time.  How can you go past chapters entitled "Don't be a snooty bum-bum" and "Bow down before the nanna and get ahead of the curve"? Here at PragSust HQ we are already doing many of the things covered in the book but Annie and Adam take the ideas to a whole new level.  Definitely worth reading and very enjoyable.


Down To Earth by Rhonda Hertzel.  After reading Rhonda's most recent book, The Simple Home, I knew I had to read this. I wholeheartedly enjoyed this book, have read it several times and given copies as gifts to friends.  Rhonda eloquently describes the ways in which we can all live a simple and more self-reliant life while spending less and enjoying life more.  The book outlines practical ways in which we can take control of our lives, become more of a maker than a consumer and reduce our environmental footprint in the process. Covering topics like finances, green cleaning, home skills such as cooking, preserving and much, much more this is a great book no matter what age or stage in life you're at. We now make our own laundry detergent and green cleaners using recipes in the book, foods such as yoghurt, as well as sustainable household goods such as the knitted dishcloth! Thank you Rhonda for sharing the things you've learnt on your simple living journey and for inspiring the rest of us.


We'd love to hear what books you're currently enjoying.


Wednesday 8 February 2017

Green woodworking with the Leura Bodger

We were fortunate to meet Roy Davi, the Leura Bodger, and spend some time watching him ply his craft when we visited Hazelcombe Farm last year.


Bodging is a traditional woodturning craft in which unseasoned (green) wood is used to make chair legs and other cylindrical parts of chairs. According to Wikipedia the term 'bodger' referred to highly skilled itinerant wood-turners who worked in the beech woods of the Chiltern Hills near the furniture making town of High Wycombe. The chair legs were completed on site, out in the woods and then sold to furniture factories to be made into chairs.

A bodger's equipment was easy to set up in situ and consisted primarily of:

A saw and an axe to cut the wood into rough pieces for use with the spokeshave and shavehorse


Wood cut on chopping block with axe

A spokeshave-like drawknife to  roughly round the edges of the wood while it is held in the drawhorse. The wood is cut along the grain while held in place on the drawhorse using pressure from the feet.


Once the wood has been roughly rounded, it's ready for turning on the polelathe. A variety of chisels are used to shape the wood as the lathe is turning using a foot pedal. 


Wood set in place and ready for turning

sauerkraut masher taking shape
Almost completed sauerkraut masher

honey drizzler being turned

Watching Roy efficiently turn out sauerkraut mashers, honey drizzlers and spoons on the polelathe you'd think it was easy-peasy.  I'm here to tell you it's not!  To get the hang of it and be able to make something even approaching professional looking would take a lot of practice.

Here are some more of Roy's wares:


Roy kindly let me have a go at turning some wood. I used the drawknife and shavehorse to roughly shape a bit of wood, and then tried my hand at turning it on the polelathe. 

It was a lot of fun. Holding the chisel at the right angle to the wood as it was turning on the polelathe was a challenge.  I'd get it working for a bit ...and then make a gouge in the wood. Needless to say it took me a long time to get the wood even to approach smoothness as I was turning it.  Roy was a very encouraging and patient teacher.  I did start to get the hang of it - sort of.  At any rate, I kept the piece of wood I worked on, even though I didn't have the time to get it completely smooth.

The experience was both engrossing and relaxing, no whine of machine noise - just me pumping the pedal with my foot, being outside in the fresh air and concentrating on working on the wood. I'm not a technophobe but I'm not all that keen on using noisy power tools so this was a great way to get into a slower, quieter way of woodworking.

If you are ever near Leura in the Blue Mountains of NSW, Roy runs day and weekend workshops where you can learn the traditional craft and make something for yourself in the process. Roy's on Facebook at https://www.facebook.com/Theleurabodger/. And for lots of discussion around all things bodging see https://www.bodgers.org.uk/BB/