Recent crafty activities at Prag Sust HQ....
These socks:
A moss-stitch cushion cover - for a cushion that was missing a cover
And some knitted dishcloths
I'd heard about knitted dishcloths but always wondered if they actually worked. After reading Down To Earth and learning of Rhonda's love of knitted dishcloths, I decided to knit us up a batch to try. I had some 100% cotton yarn in my stash which was just right for the job.
We'd been using something akin to 'Chux' cloths bought at the supermarket for wiping up in the kitchen. They got washed in the machine along with the regular washing and re-used until they fell apart. They actually lasted for quite a long time. But definitely not the 5 years that Rhonda's knitted dishcloths last her. I decided it was definitely worth giving them a go. I used Deb's waffle weave pattern which is a quick and easy project. If made in a nice quality cotton, this pattern can also double as a face washer. Just make sure you colour-code your dishcloths from your face washers so you can tell them apart when they come out of the wash :)
I'm looking forward to trying out my knitted dishcloths in the kitchen and seeing how they work out. I love the idea of making something so sustainable and long-lasting that does the job and looks nice too. And they'd make a lovely gift with some homemade soap ....
In early February, we attended a basket making demonstration by Sue Dilley, president of Basketmakers Of Victoria. It was one of the many interesting events organised by our local permaculture group.
Sue took us through a wonderful display of different baskets made from native and exotic plant fibres.
She explained how to select and dry the plant material and gave us plenty of tips:
- Drying should be done in the shade
- If you don't plan to use your
dried plant material immediately, then it should be stored wrapped up in
butcher's paper to keep it clean and dry, and with the paper labelled
to identify contents.
- Vines - to be suitable for basketmaking they must be able to wrap around your finger 3 times without breaking
- Leaves should be generally be collected after the plant has flowered and then dried.
- Grasses - to dry these, spread them on newspaper and each day move the grass around so it dries completely
Some of the plant materials we discussed were:
Spinifex - Here's a basket Sue made from spinifex grass using a darning needle and cotton thread:
Watsonia - a weed in many areas, this can be collected when it dries on the plant. It has a lovely chestnut colour.
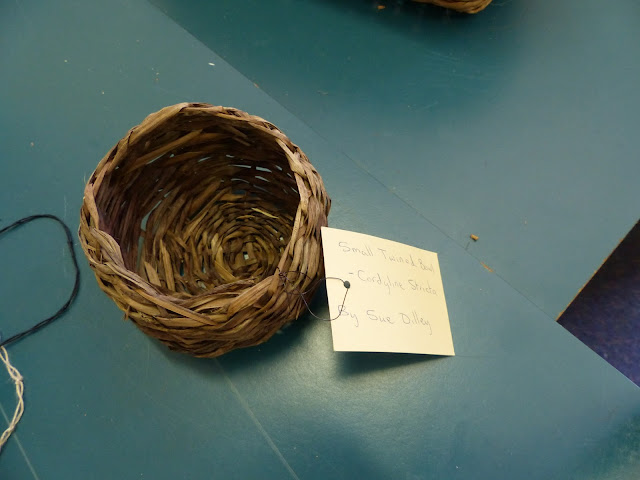
Cordyline - Cordyline australis is a tough fibre and can be collected as it drops off the plant. However if you pull it off when fresh the leaves will be in better shape (no stringy bits to them). Cordyline stricta is a lighter fibre than australis, but still good for basketmaking. Here's a basket Sue made from stricta:
Red Hot Poker(Kniphofia)- these should be collected green, after the plant has flowered
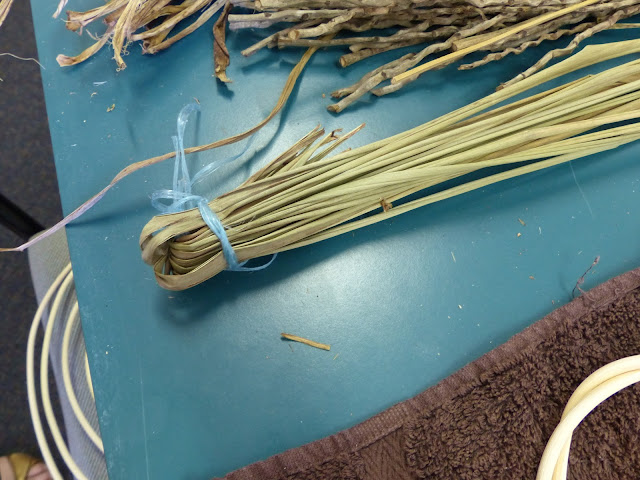
Bullrush - collect in January by cutting as low in the water as you can. Strip off the leaves and collect at the tip of the stalk, fold it over, tie and hang up to dry. You can see an example of how to tie the stalks in the picture below
Passionfruit vine - this can be used fresh or it can be coiled up until ready to use when it will need to be rehydrated slightly. Rehydration may take a couple of days if the vine is thick.
Here's a picture of a basket Sue made from passionfruit vine:
Fruit tree prunings are also a great basketmaking fibre. Sue had several examples of baskets she'd made from fruit tree prunings.
The basket below was made from apple prunings:
And this basket was made from olive prunings:
As an unexpected bonus, we all got to have a go at basket-making in the form of a small tension tray. As the name suggests, it is the tension between the branches that holds the tray together. Here's a tension tray Sue made from black willow:
Sue had kindly already cut and pre-soaked the cane for us to use. A quick demonstration and we jumped in and had a go.
Here's mine in progress:
And the finished product:
The whole experience was a lot of fun and we were very fortunate to have an expert such as Sue who was kind enough to give up her time to spend with us.
To finish this post I have to show you my favourite of all the baskets, one made from fallen Jacaranda leaf stalks. Isn't it gorgeous?
If you are interested in basketmaking, you should definitely check out the Basketmakers of Victoria website. They run a lot of events and classes where you can learn to make your own beautiful baskets.
With a bit of free time on my hands last summer holidays I decided to teach myself to crochet. I got as far as making the 2 sides of a circular cushion:
Things ground to a bit of a halt as I searched around for a cushion insert to finish the project. I wasn't able to find one so the project got sidelined.
Summer holidays have rolled around again and I figured I'd better get this project finished. I had some quilt batting and some calico ready to make my own cushion insert. Two circles of calico were cut to the same size as the crochet circles. These were then sewn together leaving an opening in order to fill the cushion.
Circles of batting were cut and put inside the calico cover.
The leftover bits of batting went in too.
Then it was time to close it all up with a bit of hand sewing.
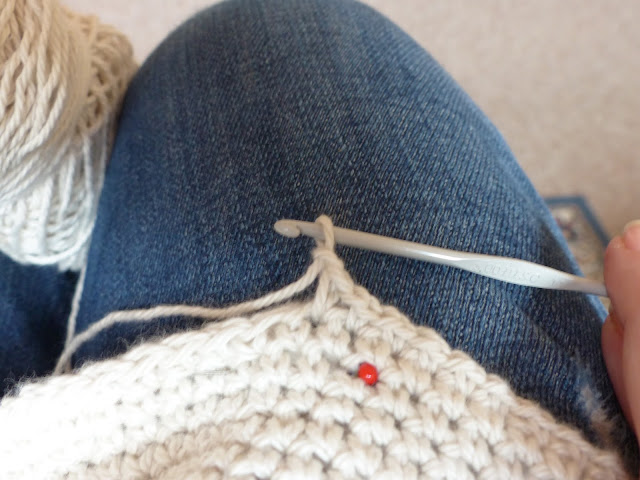
Next step was to crochet the edges of the cushion cover together. The 2 crochet circles were laid on top of each other, right sides facing out. The crochet hook was inserted through the edges of both of the crocheted circles to make a loop:
 The tip of the hook was placed in front of the yarn, then under and around it. The yarn was then caught in the lip of the hook and drawn through the loop.
This joined the 2 sides of the cushion, leaving 2 loops on the hook as shown above. The same process was repeated with these 2 loops.
The yarn was pulled through the 2 loops, leaving 1 loop on the hook:
A single chain stitch was then made and then the whole process was repeated until the cushion was sewn up. When I was 3/4 of the way around I placed the calico insert inside and then kept going.
For a first-ever crochet project, it turned out pretty well. Looks just like a cushion!
And it was nice to be able to tick one thing off the to-do list :)
Winter has arrived in our neck of the woods, and for me, that means it's time to dig out the needles and enjoy evenings sitting by the fire doing some knitting.
Here's what's come off the needles lately ....
You can read more about why I like knitting socks here.
Years ago I bought a book full of crochet projects with the intention of teaching myself how to crochet. Somehow I always got side-tracked with knitting and never seemed to find the time.
Over the Christmas break I dug out the book. Called Simple Crochet by Erika Knight, it really did have some nice things in it to make.
I thought I'd try and make the circular cushion on the cover:
Checking in the stash I found some 8 ply natural coloured cotton yarn and a crochet hook. I started off by making a simple square in the 'double crochet' stitch - the same stitch used in the cushion pattern. The book has good instructions for each of the stitches:
It took a me a few goes to get the hang of it.
Once I was happy with the square I started on the cushion. It is made up of 2 circles that are 40 cm in diameter, joined at the edges by a row of crochet. On those days where it was too hot to go outside I worked away on my circles. Eventually I got them both done:
Now all I need is a round cushion insert so I can complete the project. That has proved pretty tricky to find so I think I'll end up having to make one. Oh well, it'll get done...........eventually.
Part of trying to live more sustainably involves learning how to do things. Learning useful skills gives us greater control over how we choose to live. It also demonstrates what is involved in making many of the things we take for granted.
The role of textile crafts in making useful items that are also beautiful has always appealed to me. Over the years I've become a reasonable knitter and I've learnt to sew basic clothes, as well as have a go at repairing damaged ones. An interest in sewing then sparked an interest in quilting - in particular 'scrap quilting' - the process of making patchwork quilts using fabric scraps left over from other sewing projects. That definitely pushes my sustainability button! I have a long way to go to get the hang of quilting ......... but hey, we all have to start somewhere.
One skill that has always interested and intrigued me is weaving. Woven fabric is so integral to the way we live that we take it for granted. So in the interests of wanting to know a bit more about making woven cloth, a couple of friends and I attended a Saori weaving workshop at Art Weaver Studio.
Saori is a form of hand weaving, founded 40 years ago in Japan by a lady called Misao Jo. According to Misao Jo, ""SA" of SAORI has the same meaning as the first syllable of the word "SAI" which is found in Zen vocabulary. It means everything has its own individual dignity. And the "ORI" means weaving". The difference between Saori weaving and other types of hand weaving is that it is a free-form, creative weaving style where the weaver is not trying to replicate the uniformity and precision that would be produced by a machine. No previous weaving experience is required in order to weave using this method and there are no strict rules to follow. Sounded perfect for me.
Art Weaver Studio is located in Box Hill and is run by Heather and Greg Walters. As well as being an accomplished weaver and teacher, Heather trained with Misao Jo's son, Kenzo Jo, at SAORINOMORI studio in Osaka, Japan.
When we arrived at the Art Weaver studio the compact Saori looms were set up ready for us to start weaving. Heather had beautiful garments and other woven pieces on display to help fuel our creative spirit. Once she had demonstrated the basics of how to use the loom we were free to choose some yarns for our project and get weaving. You can see part of the studio's extensive range of yarns and two of the looms in the picture below.
Once we had chosen our yarns the next step was to blend them together onto a bobbin to create even more colour combinations. I chose a range of blues, blending them with some other yarns to add interest. Here's a picture of my piece in progress:
 |
| Projects in progress |
I have to say, learning to weave in this way was a lot of fun. As we were weaving, Heather coached us in ways to add interest to our pieces. She also explained some of the techniques used to create the beautiful pieces displayed in the studio.
We had a break for a delicious Japanese lunch prepared by Greg:
Then it was back to the studio to complete our projects. The creativity of a bunch of people who had never woven before was quite amazing. Our completed pieces at the end of the day are shown below. Unfortunately my picture doesn't do them justice - viewed in the flesh the pieces were far more beautiful than my photo suggests.
My piece (second from right) was far from perfect but I was pretty pleased with my efforts, given it was my first go at weaving. It was surprising how much fabric we were able to create in a day.
I had a great time and highly recommend Art Weaver studio if you are interested in learning this type of weaving. I would love to go back and do another class.


