Wednesday, 24 December 2014

Summer bounty

One of the good things about summer is the fruit we harvest from the garden.

Right now we are feasting on apricots and plums


Apricots


Plums

There's plenty of fruit that's still ripening, like the nectarines and peaches

Peaches

Nectarine


Other fruits still have a way to go before they're ready for picking .....

Pears


Apples


Almonds


Pepino


Mulberry

So far it's been a good harvest!


Sunday, 7 December 2014

Installing batteries at PragSust HQ

We've started the design process to install batteries at our house in Melbourne's suburbs. We thought it might be useful to discuss why we're doing this and to describe the process so others can learn from what we find.

The electricity grid in suburban Melbourne is very reliable with generally very good quality power supply. But there are those pesky greenhouse gas (GHG) emissions. As most of Victoria's electricity is generated from burning brown coal or lignite, as judged by GHG emissions Victoria has one of the dirtiest electricity supplies on the planet. By installing PV's, efficient appliances and lighting, using Green Power and some behavioural measures we've gradually reduced our GHG emissions from electricity to zero. And we have an electric oven (with gas cooktop), instantaneous gas boosted solar hot water and an efficient wood heater so we use very little natural gas.

So why install batteries? The first point to emphasise is that we're not aiming at grid independence. We think grid independence is unrealistic as a standalone system with just batteries and PV's at our house. Mr PragSust has built a detailed multiple renewables and storage modeling tool as part of a research project. This can use cost and performance data from batteries, PV's and other intermittent renewables and despatchable renewables such as bioenergy systems to model what a system costs to meet energy demands. The tool matches energy demand and generation data at half hourly intervals over a year.  PV's obviously don't generate at night. Cloudy periods during the day or over many days in winter can reduce PV generation to almost zero. So the only way a PV system can meet demand when the sun isn't shining is to have storage. But coping with extended low insolation periods very soon shows that a very large array and storage capacity is required. Even though PV's have become much cheaper and battery costs are decreasing,  the capital cost of installing a large PV generation and storage system is still prohibitive for most. 10kW is 40 250W panels. Finding space on a suburban block to fit 40 north facing panels is challenging. Let alone where to put a large battery pack. We only have weather records since the 1800's in Melbourne. The climate change models predict significant changes in Melbourne's weather which some argue have already started. What would we do if we had sized a PV-storage system for 5 days with no sun but we had 6 days of low insolation?

People on rural sites in Australia with no grid power have been running Remote Area Power Supplies (RAPS) for decades. But these tend to have generator backup for periods without sun and often these homeowners will have a very strong focus on reducing electricity consumption. Everyone in a suburban street buying a good quality generator capable of charging batteries would be a very inefficient use of resources. And while PragSust strongly supports and practices reducing energy consumption, whether the good people of Melbourne are prepared to be as ruthless on their power consumption as many RAPS sites is moot. And does it make sense to tie up large amounts of money in a stand-alone system where most of its capacity is designed to be used only for a small percentage of the year?

To get serious about sustainability we need solutions that are scalable, cost-effective and widely implementable. PV's are an excellent example of a technology that meets these criteria. So how do we think batteries can be usefully deployed with PV's while still maintaining our grid connection?

New PV systems in Victoria will receive a feedin tariff of only ~6c/KWH from 2015. (Possibly with a topup from some retailers.) Typical electricity tariffs in Victoria are around 12-15c/KWH offpeak and 25-30c/KWH peak. And at PragSust HQ we've chosen to pay about 3c/KWH extra for Green Power. So even after energy losses charging and discharging the batteries, there can be a financial benefit from storing excess PV generation and using battery power to replace peak demand currently supplied from  the grid. The electricity bills for larger electricity users may contain charges based on their peak demand during a half hour over a billing period. This reflects the  cost to the electricity supply industry of having supply capacity large enough to cope with this peak. Batteries can supply power during these peaks. This is sometimes called  shaving the peaks. As well as saving money for the electricity customer by removing the peak access charges, smoothing these peaks has a powerful and profound influence on the overall cost of the electricity supply system. Total generation capacity can be smaller. This is a significant saving. Several billion dollars worth of generation capacity in Victoria is only used for small amounts of the year. But this generation capacity has to be paid for so electricity bills are higher to reflect this cost.  The transmission and distribution network has to be sized to meet these peaks. Again, this cost can be much lower if batteries are used to meet peaks. Electricity has become a lot more expensive in Australia over the last ten years. Much of this price increase is due to new transmission and distribution infrastructure. There is now a regulatory requirement to determine the lowest cost means to alleviate perceived electricity infrastructure constraints. Batteries are one viable technology in some situations.

We need more information from actual sites with batteries in Melbourne to help make informed decisions about high penetration and 100% renewable energy systems. While modeling is useful, factories can't run on a spreadsheet. Extensive monitoring and data collection can generate information of great assistance to other electricity users, policy makers and investors.

And going back to the micro from the macro, having a system capable of supplying electricity during the occasional interruption to our electricity supply is useful.

We'll describe our progress with the battery installation in later posts. We hope this will be interesting and useful to other people contemplating battery installation.

Sunday, 26 October 2014

Learning to weave

Part of trying to live more sustainably involves learning how to do things.  Learning useful skills gives us greater control over how we choose to live. It also demonstrates what is involved in making many of the things we take for granted.

The role of textile crafts in making useful items that are also beautiful has always appealed to me. Over the years I've become a reasonable knitter and I've learnt to sew basic clothes, as well as have a go at repairing damaged ones.  An interest in sewing then sparked an interest in quilting - in particular 'scrap quilting' - the process of making patchwork quilts using fabric scraps left over from other sewing projects. That definitely pushes my sustainability button!  I have a long way to go to get the hang of quilting ......... but hey, we all have to start somewhere.

One skill that has always interested and intrigued me is weaving.  Woven fabric is so integral to the way we live that we take it for granted.  So in the interests of wanting to know a bit more about making woven cloth, a couple of friends and I attended a Saori weaving workshop at Art Weaver Studio.  

Saori is a form of hand weaving, founded 40 years ago in Japan by a lady called Misao Jo. According to Misao Jo, ""SA" of SAORI has the same meaning as the first syllable of the word "SAI" which is found in Zen vocabulary. It means everything has its own individual dignity. And the "ORI" means weaving". The difference between Saori weaving and other types of hand weaving is that it is a free-form, creative weaving style where the weaver is not trying to replicate the uniformity and precision that would be produced by a machine.  No previous weaving experience is required in order to weave using this method and there are no strict rules to follow. Sounded perfect for me.

Art Weaver Studio is located in Box Hill and is run by Heather and Greg Walters. As well as being an accomplished weaver and teacher, Heather trained with Misao Jo's son, Kenzo Jo, at SAORINOMORI studio in Osaka, Japan.

When we arrived at the Art Weaver studio the compact Saori looms were set up ready for us to start weaving. Heather had beautiful garments and other woven pieces on display to help fuel our creative spirit. Once she had demonstrated the basics of how to use the loom we were free to choose some yarns for our project and get weaving.  You can see part of the studio's extensive range of yarns and two of the looms in the picture below. 


Once we had chosen our yarns the next step was to blend them together onto a bobbin to create even more colour combinations. I chose a range of blues, blending them with some other yarns to add interest. Here's a picture of my piece in progress:


Projects in progress

I have to say, learning to weave in this way was a lot of fun.  As we were weaving, Heather  coached us in ways to add interest to our pieces. She also explained some of the techniques used to create the beautiful pieces displayed in the studio.

We had a break for a delicious Japanese lunch prepared by Greg: 


Then it was back to the studio to complete our projects. The creativity of a bunch of people who had never woven before was quite amazing.  Our completed pieces at the end of the day are shown below. Unfortunately my picture doesn't do them justice - viewed in the flesh the pieces were far more beautiful than my photo suggests. 


My piece (second from right) was far from perfect but I was pretty pleased with my efforts, given it was my first go at weaving.  It was surprising how much fabric we were able to create in a day.

I had a great time and highly recommend Art Weaver studio if you are interested in learning this type of weaving.  I would love to go back and do another class.


Monday, 20 October 2014

Do the shake


We're doing the shake....................the sugar shake, that is.

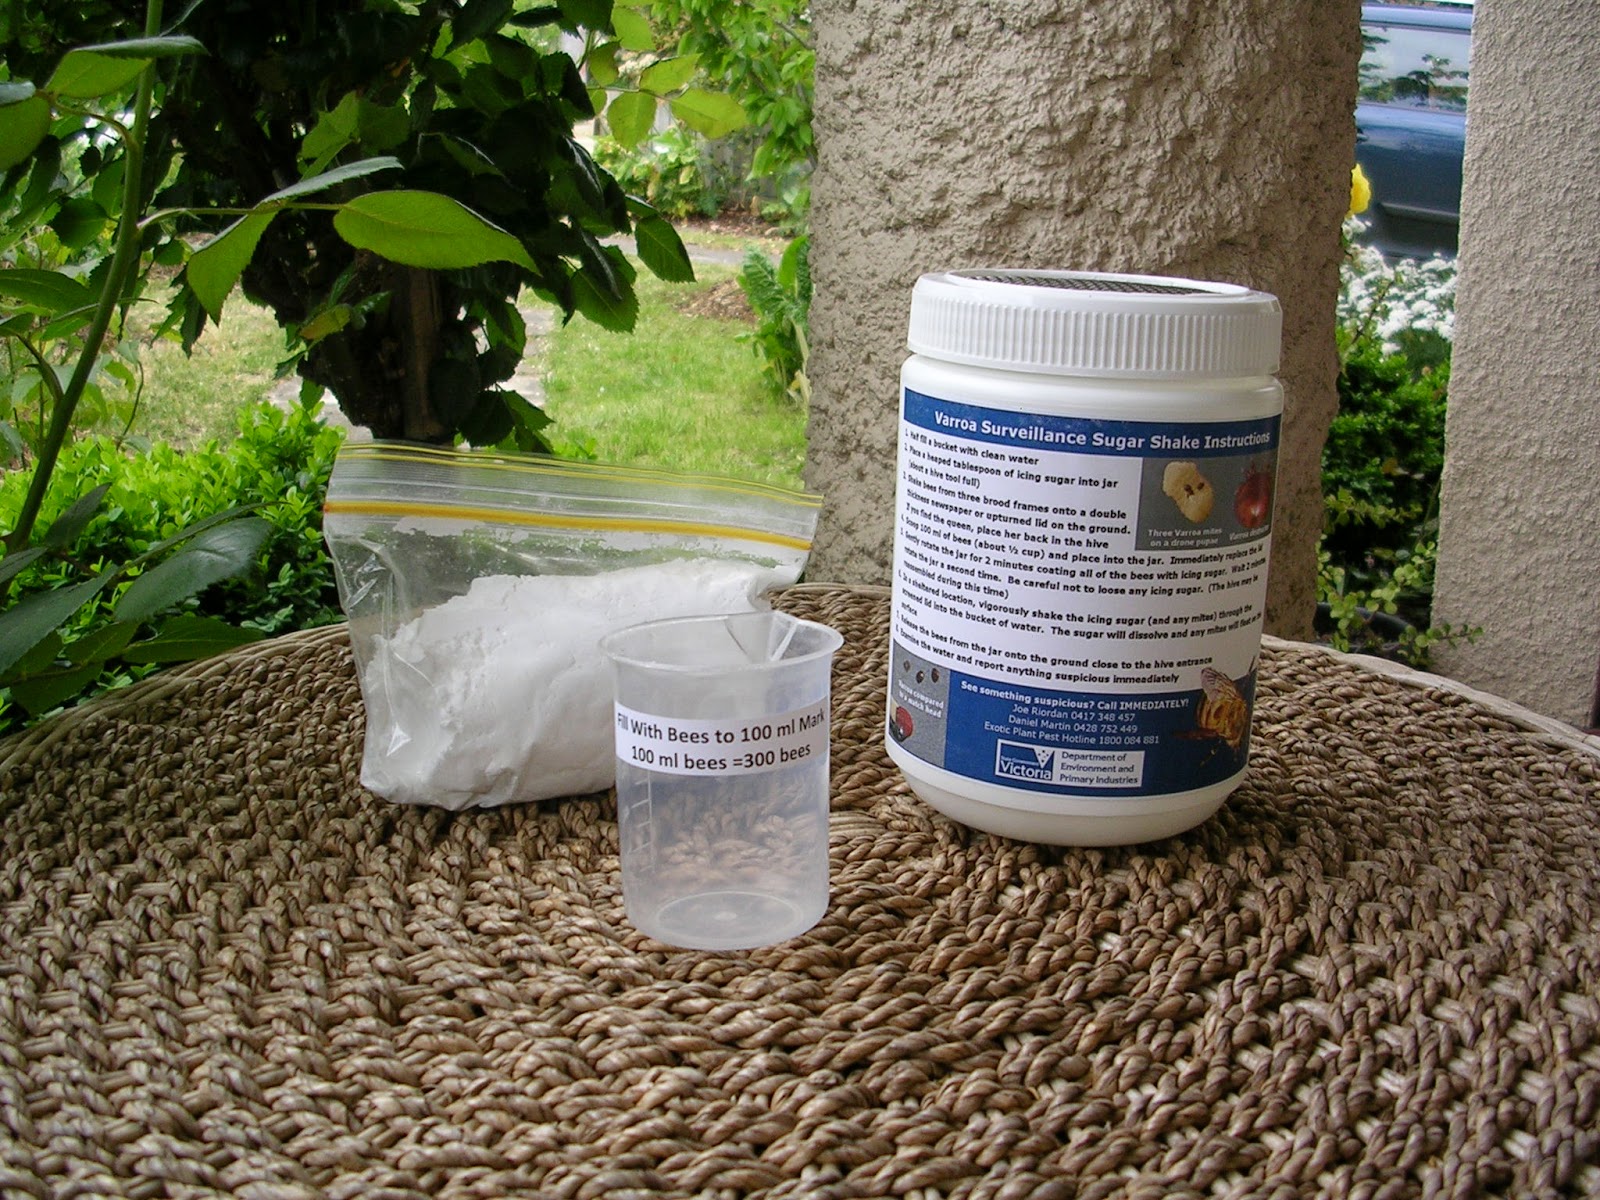
DEPI Varroa surveillance sugar shake kit
  
As you may be aware, Australia is the only country that does not have the dreaded varroa mite and we're trying to keep it that way. The Department of Environment and Primary Industries (DEPI) is running several surveillance programs for early detection of an incursion of varroa at, and near, shipping ports.  At a recent bee club meeting, Daniel Martin, the DEPI Apiary Inspector from Bendigo gave us a presentation on the department's programs.
 
In addition to the port surveillance programs, DEPI also runs a sugar shake detection program. This is where we urban beekeepers can do our bit to help with varroa detection. The program encourages beekeepers to test their own hives for varroa using the simple sugar shake (or roll) test. This test works as follows - when varroa mites are dusted with pure icing sugar, the fine granules stick to their pads (feet) and they are no longer able to grip the surface on which they cling. The dusting of adult bees with icing sugar causes mites to fall off the bee into the white sugar where they are more easily seen. This process does not harm the bees.

Beekeepers who volunteer to join the DEPI sugar shake program receive a kit, along with a letter explaining the requirements of the program.  Participants will receive 3 requests from DEPI during the year to test their hives using the equipment supplied.  It seemed like a good thing to do so we signed up.  A few weeks later the kit came in the mail. 

The kit consisted of:
  • a 500g plastic container with a screw-top mesh lid. Instructions on how to perform the test were stuck to the side of the container.


  • a 100 ml plastic measuring vessel


  • a bag of pure icing sugar


In addition to the supplied kit, the following equipment is also required:
  • tablespoon for measuring icing sugar
  • sheets of newspaper
  • light coloured bucket (white or other light colour)
  • fine close-weaved household cleaning cloth or coffee filter paper
  • bee smoker, hive tool and protective clothing
  • magnifying lens (if available)
  • water-proof felt marking pen.

The actual test and reporting proces is described below. This information and the  accompanying photos have been taken from the DEPI website. Check out the website for further information on varroa and beekeeping in general.

Method

  • half fill the bucket with clean water
  • place a heaped tablespoon of icing sugar into the jar after removing lid
  • light a smoker and open a hive to be tested
  • shake some bees from three combs containing honey bee brood onto a double thickness of newspaper or upturned hive lid placed on the ground. If brood is not present, shake bees from one comb taken from the centre of the cluster of bees. If you find the queen on these combs, place her back into the hive
  • scoop or pour about 300 bees (half a cup) into the jar. Place the lid on the jar to prevent bees from escaping
  • gently rotate the jar for 2 minutes ensuring all bees are dusted with sugar. Wait 2-3 minutes, and rotate the jar a second time for 2 minutes. Be careful not to lose any sugar. (The hive may be reassembled during this waiting period)
  • gently shake the icing sugar (and any mites) through the holes in the lid into the bucket half filled with water. The sugar will dissolve and any mites will float on the surface of the water. Do the shaking in a sheltered position protected from strong wind that could blow mites away
  • release the bees from the jar onto the ground close to the hive entrance in case the queen is present.

Photo 2. Shake some bees from 3 combs on to newspaper

Photo 3. Pour about half a cup of bees into the jar

Looking for varroa and collection of specimens

Photo 4. Gently shake the sugar into the bucket containing water

  • examine the empty shaker jar and lid for varroa. If you wear glasses to read, wear them while looking for varroa. The mites are reddish-brown; 1.1 mm long and 1.7 mm broad
  • inspect the water surface for varroa, other mites and insects. If you find any, carefully place them into a small jar with methylated spirits and place the jar in a cool position away from sunlight
  • alternatively, pour the water through a piece of light coloured fine close-weaved household cleaning cloth, or coffee filter paper. Inspect the cloth or filter paper for varroa, other mites and insects. If any of these are present or suspected to be present, place and seal the filter cloth or filter paper in a small zip-lock plastic bag or other sealable container
  • use a water-proof pen, label the specimen jar and/or ziplock bag and the hive tested with the same number for later identification.


Steps if you find or suspect presence of varroa in your apiary

It is important that when varroa is found or even suspected to be present in an apiary that it is not spread to another apiary. The following steps will help to reduce the risk of spreading it:
  • don't mail or forward any varroa (and other mites and insects), until advised by a Department of Primary Industries apiary officer. Never take live specimens from the apiary as this may help to spread the parasite or pest
  • don't remove bees or any hive components from this apiary as this could help spread the mite
  • place overalls, veil, gloves (and guantlets) and hat in a plastic bag and leave them at the apiary site until advised by a DPI apiary officer
  • before leaving the apiary, inspect your vehicle to make sure that there are no bees trapped inside or on the radiator. Spray and remove any bees that could be carried from the apiary. Check the tray of the truck, ute or trailer as well. Boxes of combs and other hive material on your vehicle which bees might have entered must be left at the apiary
  • thoroughly wash hands, hive tool, smoker and any other equipment to ensure varroa is not carried from the apiary
  • use a fine toothed comb or brush to remove any mites that may have lodged in hair or beards
  • check clothing for any 'passenger' bees that could be carried by you when leaving the apiary. If another person is with you, have them check your clothing for passenger bees.
 

Notifiable disease

If you see or suspect varroa is present in your apiary, you must notify an Inspector of Livestock (DPI apiary officer, animal health officer or veterinary officer) without delay and by the quickest means possible. The easiest way to do this is to ring the Disease Watch Hotline 1800 675 888 (24 hours a day, every day of the year).

------------------------------------------------------------------------------------------------------------------------

The test instructions seem fairly straightforward. Still, I think it might be a good idea for us to have a practise run before getting the call to do it for real....


Saturday, 18 October 2014

Busy as a .....

Busy as a ............yep, you guessed it.......... bee.

Here are some photos taken in our garden last weekend.

bee on sage


bee on rose geranium


bee visiting a stone fruit tree


a beautiful callistemon flower


Friday, 3 October 2014

Current reading list

Here's a snapshot of some of the books we're reading at the moment.

Natural Beekeeping: Organic Approaches to Modern Apiculture by Ross Conrad. As the spring beekeeping season kicks off I'm revisiting this book.  It's full of useful information for those who want to keep their hive healthy.  In the book Conrad details a holistic, sensible alternative to conventional chemical practices with a program of natural hive management. While we are yet to get varroa here in Australia, we do have plenty of other pests and diseases, and we'd be well advised to be prepared for the arrival of varroa and what that will entail.  Conrad outlines 'do no harm' strategies for keeping honey bees healthy and productive with non-toxic methods of controlling mites, selective breeding for naturally resistant bees, as well as plenty of other tips and tricks.  Chapters include:
  • Why Organic Beekeeping?
  • Working the Hive
  • Hive Management
  • Genetics and Breeding
  • Parasitic Mites
  • Insect Pests
  • Environmental and Human Threats
  • The Honey Harvest
  • Organics and the Evolution of Beekeeping
It's a book aimed at beekeepers of all experience levels and well worth a read.


Green Kitchen Travels by David Frenkiel and Luise Vindahl. We have David and Luise's first book, The Green Kitchen, and I think this new book is even better. Ninety healthy vegetarian recipes, many of them vegan, with drop-dead gorgeous photography.  For me a picture speaks a thousand words and the pictures make me want to cook everything in this book.


Made by Hand by Lena Corwin.  I'd been following Lena's blog for quite some time and was looking forward to getting my hands on this book.  Being a crafty sort of gal, the projects in this book appeal to me and it is beautifully photographed. 


I definitely want to try making the beeswax candles with all the wax I've been purifying from our hive....and would love to have a go at some of the dyeing projects.  In fact there are a lot of projects in the book I'd like to tackle.


Any good books you've been reading lately?


Monday, 29 September 2014

Bees at the Royal Melbourne Show - 2014 edition

Well it's September and that means Royal Melbourne Show time again in Melbourne. After my experience last year as a volunteer at the Victorian Apiarists' Association (VAA) stand, I was looking forward to doing it all again this year.  


One of the reasons I enjoy helping out at the stand is the opportunity to chat to all the other beekeepers. The VAA volunteers come from all over the state. Many of them have been keeping bees for decades and are huge sources of beekeeping wisdom.  It's a great opportunity for relative newbies like me to tap into that knowledge and I'm not backward about doing that :)

This year, in addition to the great range of Victorian honeys for sale there was also comb honey.


The stall display included a beautiful array of different coloured honeys.


Different types of candles were for sale, as well as beeswax hand cream, beeswax furniture polish and honey soaps.


As well as selling honey and other bee-related products, the stand is a great way to chat to the general public about bees and highlight the important role they play in our food security.  I think people are quite surprised when they discover how much we rely on bees for the fruit, nuts and veg we all take for granted. The image below illustrates the situation nicely.

via


I had a stint at the stall talking to the public who came up to see the observation frame. This is a frame in a ventilated glass case, complete with bees like the one in the picture below.  It's a great way for the public to get up close and see what the inside of a beehive looks like. The frame had some brood, honey, and bees, including a queen, so there was plenty to see.
 
Observation frame at the VAA's outdoor spot in the My Backyard area of the Show


I also spent some time outside the bee cage, describing to the public what the beekeeper was doing inside the cage when he opened the hive.  As usual, everyone was amazed that the beekeeper wasn't wearing gloves as he went about his business.

Hive in the ventilated bee cage


It was a busy day but I did get a brief chance to have a bit of a look around. These crocheted cows made me smile.


I caught up with chicken expert Megg Miller at the Chicken Breeds stand. In addition to being a chicken breeder and poultry expert, Megg is the editor of Australasian Poultry as well as Grass Roots, an Australian magazine about self-reliance, farming, gardening, eco-living, DIY, cooking and craft. Grass Roots is a great magazine, still going strong after first hitting the shelves 40 years ago.  Megg also shares her chook wisdom in magazines such as Organic Gardener and kindly gave a talk to our local permaculture group some years back. She had some of her beautiful chooks on display, one of which was lying on her lap having a  bit of a snooze in the sun while Megg talked all things chicken to the people who visited the display. That was one contented chicken - I wish I had taken a photo!

Frizzle rooster on display with his girls in the Chicken Breeds area
  

All in all it was a very enjoyable day and I look forward to doing it again next year.


Thursday, 25 September 2014

Hive insulation over winter - did it work?

Back in May I mentioned that we were trialling some insulation on our hive over winter. The previous winter we had noticed that there was a fair bit of condensation in the hive - on the top mat and under the lid.  In an attempt to avoid that this year we used some wall insulation sheeting, laid directly on the frames in the top box, as described here.  Now, almost one month into Spring and with the days warming up, it was time to look inside the hive and assess how well the insulation had worked.

When I removed the lid I was pleased to see that the hive mat and insulation sheet were  both dry, as was the underside of the lid.  This was a big improvement over last year.


Peeling back the insulation I could see that there were lots of bees in the top box. They had glued the insulation sheeting to the top bars in a few spots but it was still very easy to peel back and remove.


I checked the second frame in the top box (second from right in picture above) and it was about 80% capped brood, laid in a good solid pattern.  All looked well. A check of the bottom board showed it was clean and dry.

It seemed that the insulation had done a very effective job of reducing condensation in the hive over winter.  We'll take it off over spring and summer but will definitely use it again next year when we pack down for winter.

Have you had an issue with condensation in the hive?  If so, what did you try? How well did it work?


Monday, 22 September 2014

Taking a home, building, community, region or nation towards 100% renewable

Mr PragSust has been doing stuff in renewable energy off and on for several decades. There's a lot of interest in Australian communities in moving towards 100% renewable.  PragSust HQ has been carbon free for some time with a biomass heater, PV's and solar hot water. And we've reduced our energy use through various energy efficiency measures. Generally speaking, reducing your energy consumption, using Green Power and installing renewables such as solar hot water and photovoltaics will reduce your emissions. But if you would like to be a bit more systematic, here's a list of steps that might be useful as an initial checklist at a number of scales.

a/ Characterise the energy use at the site in question. As the old saw has it, if you can't measure it you can't manage it.
  • How much energy is used.
  • When is the energy consumed within a day, in a week and across the year.
  • What sort of energy ie thermal or electricity. 
  • How much does the energy cost.

b/ Identify energy efficiency measures. As per the perky little aphorism from several decades ago, "Weatherise before you solarise." In Melbourne, companies such as ecoMaster and ecomad specialise in these assessments for residential and commercial buildings. PragSust HQ has had help from both companies with pleasing results. Specialist companies are available to do thorough assessments for industrial and large commercial sites.

c/ Reduce energy use by implementing cost-effective energy efficiency measures. It's a lot easier to find a cheap, cost-effective, practical renewable solution for smaller energy demands. Australian houses, for example, are generally appallingly inefficient with respect to thermal performance ie they leak heat like a sieve. Heat goes out in winter and comes in during summer. There's nothing sexy about roof, wall and underfloor insulation but it is very effective if good quality and properly installed. Weatherproofing to reduce draughts is simple and effective if done properly. In Australia's generally mild climate a well-designed, well-built house achieving HERS 9+ stars or PassivHaus (Australian Passive House Association and Passivhaus Australia have local introductory information on the PassivHaus approach) should need little to no heating and perhaps a small amount of air-conditioning in hot weather. Other measures such as LED's and energy efficient appliances are nice and easy. For larger industrial and commercial energy users, energy efficiency companies say it's not uncommon for them to find 30% reductions in energy consumption at these sites with quick payback periods.

d/ Determine the residual energy demand.

e/ Characterise renewable energy available at the site including any seasonal variations. Renewable energy sources available might be biomass, solar, wind and so on. Each of these sources will have scales and technologies that suit particular demands.

f/ Cost-effectively match the energy sources available with the demands.
  • Is storage cost-effective? This might be thermal storage in a tank, battery storage for PV's or hydro storage at larger scale. 
  • Can excess generation be sold? For example, feedin tariffs for excess PV generation beyond onsite consumption. Anther example is industrial parks like the one in Gussing, Austria to use process steam from a biomass CHP system.
  • Can any demand be deferred or scheduled to match with generation from an intermittent energy source such as solar?
g/ Have the renewable system installed by a reputable company that will do a good job. PragSust has had excellent results from Corospark for various residential-scale renewable systems. Corospark are also doing PV installations at 100kW scale for commercial sites, energy efficient lighting refits for residential and larger sites and voltage optimisation systems for large energy users. Going Solar are designing and installing solar hot water systems for larger sites including school campuses and apartment buildings.

h/ Identify how to meet the demand remaining after deploying cost-effective renewables.This might be from a Green Power scheme.

Rinse and repeat!

Monday, 15 September 2014

Weighing the hive

One way to get an indication of what's happening inside a beehive without having to open it up is to weigh the hive. There are several reasons why this useful.

Firstly, weighing a hive can be done regardless of the weather. This is especially useful during winter when it's too cold/wet/windy to open the hive. Regular weighing allows the beekeeper to assess the amount of stores the hive has. This information can then be used to assess whether supplementary feeding may be required.

Secondly, weighing the hive does not disturb the hive environment. Understanding the importance of the hive temperature and humidity, how this affects hive health, and how to use this knowledge to look after your bees is important. Bees expend considerable energy to maintain the ideal temperatures and humidity inside the hive. Opening a hive and especially moving comb can cause rapid and dramatic shifts in both those variables and cause undue stress for the bees. According to David Heaf in his book The Bee-friendly Beekeeper, every opening of the hive that lets the heat out forces the bees to repair the damage - repropolising and repairing comb that may have been broken - and to restore the 'thermal structure' of the colony by extra heat producing activity. In winter, the cluster can take as much as 3 days to return to normal. Depending on the extent of comb manipulation, even in summer the restoration of the pre-opening condition could take as much as a day. Thomas Seeley, the well-known bee biologist, found in his 2007 study, Honey bees of the Arnot Forest: a population of feral colonies persisting with Varroa destructor in the north-eastern United States, that feral bee colonies left alone were able to better co-exist with Varroa mites than those managed in a more conventional way.  So while it is tempting to want to open your hive frequently to check for problems and progress it's worth bearing in mind that bees carefully manipulate the environment inside their hives and any disruption to that environment can cause or exacerbate the very problems that you are checking for.

The system we use to weigh our hive was invented by Andrew Janiak, convenor of the Natural Beekeeping group, of which we are members. Andrew and his clever beehive scales were featured on the ABC New Inventors television program where his scales won the Peoples' Choice award.  More details and a short video showing how the scales work can be seen here.

Essentially the system consists of a simple hinged timber platform that sits permanently under each hive, and a light weight portable frame that holds the scale. The scale is inserted between the two halves of the platform (at the rear of the hive) then the handle is moved to determine the weight.

Here are some photos of the platform. The hive is positioned on the base so that the entrance is above the hinged edge. (The hinged edge is on the left side in the first picture below)


Here's a picture of our hive sitting on the base:


The scale consists of a light-weight metal frame which is easily carried from hive to hive. The platforms are very cheap to produce, costing only about $4-5.00 each.

Here's a picture of the scale positioned on the base, ready to be used. A 'hive' consisting of a couple of empty boxes is being used here for demonstration purposes. You can see that with the handle in the down position the hook is raised. The legs of the frame are sitting in the metal guides. The metal guides can be seen more clearly in photo 2 above.

Frame sitting in position on base

 
Zero the scales before engaging the hook


To measure the weight of the hive you firstly position the scale so that it sits in the metal guides in the platform. The next step is to zero the scales and then lift the handle to allow the hook to move down so it can be manually attached to the platform. Once the hook is engaged, the handle is gently pushed down until it can move no further. Pushing the handle down raises the hook and thus the platform. Once the handle is in the fully 'down' position the weight is recorded. The scale has leverage of 1:10 so you only need to lift a tenth of the weight of the hive. It is also impossible to lift the hive more than a few cm, meaning there is less chance of disturbing the bees or toppling the hive.
 
Move the handle down to weigh the hive. This will raise the hook and in doing so, lift the base.
When handle is fully extended downwards and scale light stops flashing the weight is recorded.


The amount of force required to push the 2 halves of the platform apart determines the weight of the hive. The scale is actually set to show 1/2 of the weight of the hive, then you can multiply to get the whole weight.

By keeping regular weight records over the year the beekeeper can get a picture of how the hive is performing. Of course, to ensure consistency it's best to take the measurements at the same time of the day, preferably early evening when everyone is back inside for the night. That way your results will be comparable. The weight going into and out of winter is very useful to help determine how much in the way of stores the bees used over winter. Also, if you have several hives you can use this method to help identify any hives that may be struggling, allowing you to take the appropriate action before it's too late. Weight data is also a handy way to identify if there is a honey flow on as the hive will quickly put on weight.  We use weight data to help identify when a super is ready for harvesting.

While not removing the need for occasional inspections, weighing the hive reduces the need to continually open it up and disturb the bees. We've been weighing our hive on a weekly basis for over a year now, and thanks to Andrew's scales, it's quick and easy to do.  The information we're gathering is helping us better manage our bees and in our opinion it's definitely worth the small amount of effort involved.